TestRail Test Case Execution – Test Execution in TestRail

To execute the test cases that have been written in Test Suites and Cases section. You need to create a test run of the particular test suite for TestRail Test Case Execution.

This can be done through Test Runs & Results tab.

TestRail Test Case Execution
Test Runs and Results

First, you need to create a Test Run for a specific release or milestone or for a section from Test Runs & Results section.

You can do this from Run a Test under Test Suite & Cases tab also. A Test Run consists of all or specific set of test cases of a particular section. the

This is extremely useful to ensure proper regression testing to be carried out.

For example, if you have previously executed a set of test cases in the previous release and customer has asked for some changes in the implemented functionalities.

When developers implement the requested changes and provide the build for testers to test, then tester need to retest the new functionalities along with regression.

Now you can easily select the test cases which can be impacted due to this new changes and create a new Test Run to execute those test cases only.

This way you can easily manage the regression activities effectively.

In TestRail all the tests have one of five different statuses by default with different color legends.

You can change the status of a test case either by clicking on the Add Result button on the Test Run page or by directly selecting the status in the Status drop-down.

The following statuses are available by default:

Untested:

Whenever a test case is added to a test run, the status becomes Untested. This indicates that the Test Case has not been executed yet.

Passed:

A test is marked as Passed whenever the expected result matches with the actual result.

Failed:

A test is marked as Failed whenever the expected result deviates from the actual result. This indicates that this particular functionality is not working as expected. For each Failed Test Case, defect should be logged.

Retest:

When a developer fixes the problem and needs to be re-executed, then these test cases should be marked as ReTest.

Blocked:

When a test case can’t be executed due to some issues (either there is a blocker issue or the particular functionality is not implemented yet), then those test cases need to be marked as Blocked.

Once all the test cases are executed properly, you can close the Test Run from Edit page. Once closed, the particular test run can’t be changed.

TestRail Test Cases – Creating Test Cases and Test Suites

The most part of Test Management activity is creating and executing the test case. TestRail Test Cases management is very simple and easy. Simply follow the steps below to add new test cases.

Test Case can be efficiently managed using TestRail from Test Suits and Cases tab.

TestRail Test Cases can be easily added from TestCases tab.
Test Case in TestRail

TestRail test cases are grouped into test suites. A test suite is created for specific functionalities.

These test suites are called as Section in TestRail. For each specific functionalities or modules, you can create different sections.

A section can be created by clicking on Add Section option on the right side of Test Suites & Cases section.

For example, if you want to write the test cases for Login functionalities, then create a section named Login and consolidate all the test cases for Login inside this section.

You can further divide each section into separate subsections to drill down further.

To write the Test Cases for a specific section click on Add Test Case option and write the Title of the Test Case and press Enter.

A Test Case consists of Test Summary, Pre-Condition, Test Steps, Expected Result. To complete the test case, click on the Title of the Test Case and click on Edit button.

It will open the Test Case design window with all the customised columns. The user can design the test case and click on Save to save the test case.

Adding Test case in TestRail
Adding Testcase in TestRail

Note: One can customise the columns as per his or her requirement that will be present in the Test Case design screen. This can be done through Administration->Customization.

TestRail Dashboard – Dashboard Introduction and Customization

TestRail dashboard is the home page of TestRail. After login into TestRail with a specific account, the first page that is displayed is the Dashboard page.

The dashboard is a summary of available projects and the recent activities. By clicking on a project title, you will be redirected to project details page which includes test suites, active test runs, project activity and so on.

You can switch to another project by clicking the link “Return to Dashboard & Projects”.

[image_frame url=”http://rcvacademy.com/wp-content/uploads/2016/09/TestRail-Dashboard.png” border_style=”boxed-frame-hover” action=”open-lightbox”]

The project detail view consists of following tabs as depicted in the picture:

Overview:

This tab describes the summary of the project in TestRail

Todo:

ToDo tab displays the list of ToDo’s assigned(if any) to the logged in TestRail user. If no assigned tasks for the user is there, then it will be blank.

Milestones:

Milestones tab displays the no of milestones created for this project. Best practice is to create different milestones for each release.

Test Runs and Results:

This tab describes the no of Active Test Runs and Results for this project and the test case status for this Test Run.

Test Suites & Cases:

This tab describes all the Test Cases that have been designed for this project

Adding TestRail Users – TestRail Roles and Users Setup

For adding TestRail users or update existing users, you need to log in as an Administrator.

You can add users to TestRail instance which can be either team member or customer.

To add the new user, select Administration -> Users & Roles from the TestRail.

You can add one user at a time or multiple users at a time.

Similarly, you can edit and deactivate the user as well.

Note: Subscription fee is decided based on the number of active users. So, create users as per the requirement only.

When a user is added, by default it is created with “Lead” role. You can change the role as per the user activities.

For example, if the user is a Developer, then the Developer role should be provided. You can change the role by simply selecting the proper value from Role drop-down.

With each role, a set of access rights is automatically provided. So, the user created with a specific Role will automatically inherit the assigned access rights.

Steps for adding a user:

  1. Login into TestRail with Administrator
  2. Click on Administration -> Users & Roles
TestRail Dashboard
TestRail Dashboard
  1. Click on Add User
  2. Provide Full Name and User email address
Adding TestRail Users
  1. Check the Enable email notification option

After all these steps, the user will receive an email containing a link to activate the account.

Clicking on the link user will be prompted for the password. The user just needs to set the password for his/her account and his TestRail account is ready.

Watch video tutorial about Users and Roles in TestRail

Creating TestRail Projects – Steps to create new projects

The project defines the actual work that we need to perform as a part of testing. In this post, we will learn about creating TestRail projects step by step.

Many times we need to work on multiple projects simultaneously. It will be very difficult to monitor the testing activities if projects are not managed properly.

Using Test Rail, we can easily monitor the testing activities of different projects. A project in test rail has five basic components:

  • Todos: Todo list is used to view the number of tests assigned to a particular tester. This is helpful in understanding the workload of the team members.
  • Milestone: A project milestone defines a version release. We can define several milestones for a defined project to define the release process.
  • Test Suite: A Test suite is a collection of Test Cases which will be used to define the test scenarios for the different functionalities.
  • Test Run: A Test Run defines the execution status of the test cases. It can be Passed, Failed, Blocked, Not Run etc.
  • Reporting: Reporting is used to generate different types of report. Reporting is very useful to track the progress of the testing activity.

Note: For creating a project, the user needs to have Administrator access. User Access is explained in later posts.

Steps for creating a project in TestRail:

  1. Login into TestRail with Administrator
  2. Select Project tab and click on “Add Project” buttonCreating Project in TestRail
  3. Provide a proper name of the project and press Enter

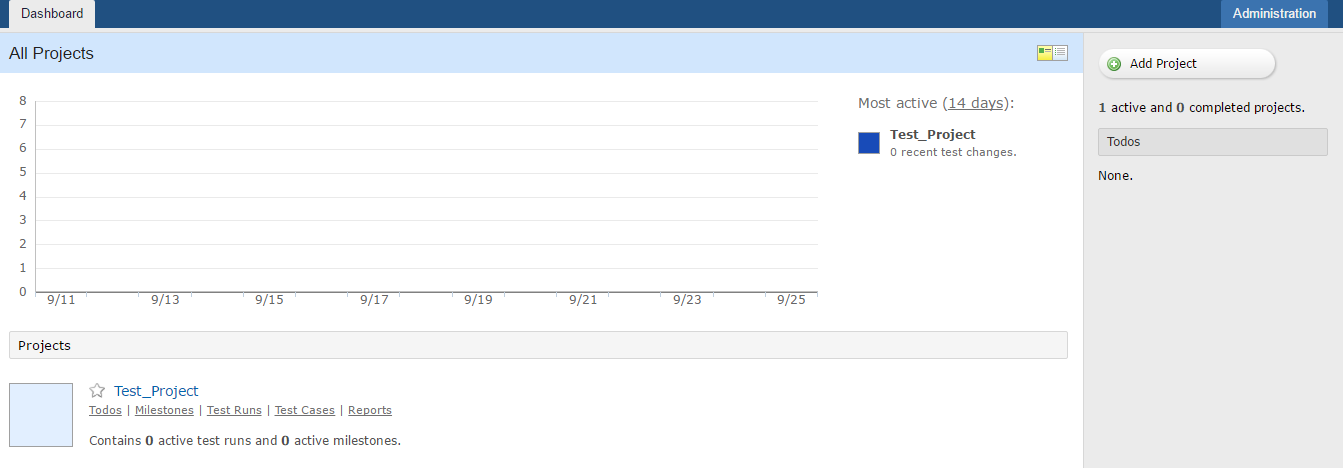
This is a sample snapshot of the Project dashboard. There are two types of projects:

  1. Active Projects: The projects for which testing is going on currently and is not released yet.
  2. Completed Projects: The Projects for which testing is completed and is released to the customer.

In the top left of the project dashboard, all the active projects and their recent status have been projected as a graph view.

It includes the recent changes in the last 14 days

In the bottom left of the project dashboard, all the active projects along with the number of test suites, number of active test runs and number of active milestones are displayed.

In the right side of the dashboard total number of projects is displayed.

display projects in testrail
Display all projects in TestRail

Watch the video tutorials below to understand more about TestRail projects

Project Options in TestRail